tel: +1 (800) 996-8617
  • Fully Automated DIY Turntable for 360 Product Photography by Adam Pereszlenyi

    We have seen our share of cool DIY 360 product photography turntables, but this recent tutorial is a rare find!

    Adam Pereszlenyi from Hungary shared tons of info and supporting materials for his DIY solution: from step-by-step guide on how to build the hardware and automation via Arduino Nano to free software and designs for 3D printing of some of the parts required for his assembly.

    To control the camera and turntable rotation Adam developed a piece of software that requires Linux OS and which can be downloaded on his website for free (although donations are welcome!). The camera support that his Linux solution provides is impressive – more than one thousand cameras (list of supported cameras).

    This motorized turntable for 360 product photography can be an answer for those folks who like to build DIY solutions and don’t want to shell out for professional equipment such as Ortery PhotoCapture 360.

    We thank Adam for putting together such a neatly organized tutorial!

  • WebRotate 360 Product Viewer Integration with Squarespace

    This post was revised on September 11, 2018 to incorporate the latest viewer release.

    Even though Squarespace is still lacking support for third-party plugins, we now have a new integration option for Squarespace that looks similar to the embed shortcodes in our WordPress and Joomla plugins (full list).

    Squarespace doesn't allow uploading folders with 360 product images to their hosting so a separate web hosting account is required. For example, you may use an existing website hosting you may already have outside of Squarespace, setup an extra hosting account, or consider our optimized PixRiot service. We would be happy to upload your tests to our servers free of charge if you need to run any tests (just let us know).

    LIVE DEMO

    Now lets review how to integrate your published views in Squarespace.

    1) For a quick youtube-style integration using iFrame, please refer to our user guide under Web Integration -> Embed via iFrame. If this works best for you, you may ignore the rest of the post.

    2) Publish a 360 product view using WebRotate 360 SpotEditor that you can download here. Here's a quick video that walks you through the basic steps.

    3) Upload the contents of the 360_assets folder that you will see in the published folder under your SpotEditor project directory (or wherever you have chosen to output your published 360 product view) to your web hosting. You can upload it right away on publish in SpotEditor using our built-in FTP option (check "Upload assets only") or use a popular FTP client such as FileZilla or a browser based file manager that comes with your web hosting.

    4) Once uploaded, note the location of the xml file inside the uploaded folder (e.g http://my-domain.com/360-views/my-product/my-product.xml). You'll will need this URL for the next steps.

    For a quick test, you can also use this URL of our example 360 product view:

    https://cdn.webrotate360.com/examples/3.6/sampleshoe/config.xml

    5) Login to Squarespace and expand a page where you plan to integrate your published view.

    6) Click Settings to configure this page and then select Advanced. Paste the following lines under Page Header Code and click Save.

    <script src="https://cdn.webrotate360.com/lib/jquery/jquery.js"></script>
    <script src="https://cdn.webrotate360.com/lib/imagerotator/latest/js/imagerotator.js"></script>
    <link href="https://cdn.webrotate360.com/lib/imagerotator/latest/css/round.css" rel="stylesheet">

    Note 1: you may not need the first line (jQuery script) as your Squarespace theme may already include it. You may also replace round.css with your skin of choice (e.g, basic.css, thin.css, empty.css, retina.css, zoom_dark.css, zoom_light.css).

    Note 2: if you don't want to paste these scripts on every page where you add the product views, simply paste them under Code Injection->Header which is located under Settings->Advanced->Code Injection.

    7) Add a new Squarespace Code block to the page content and paste the following, replacing the URL next to "xmlfile" with the one your have uploaded in the previous step or the example URL we show in step 4 and then update width and height as needed.

    <div class="wr360embed-cdl" style="width:100%;height:600px;"
    data-imagerotator='{"xmlfile":"http://your-config-url.xml"}'></div>

    PS: there're few options that you can configure in the last step. Below is an example with all of the available options listed in one place:

    <div class="wr360embed-cdl" style="width:100%;height:600px;" data-imagerotator='{
        "xmlfile":"http://your-config-url.xml",
        "graphics": "https://cdn.webrotate360.com/lib/imagerotator/graphics",
        "basewidth": 1024,
        "minheight": 400
        "events": true,
        "name": "my-view",
        "rootpath": "http://my-cdn-for-images.com/product1/",
        "onready": your-javascript-callback}'>
    </div>

    Here's more details on each option:

    • basewidth - viewer width in pixel that you can set to allow the viewer window to scale not just horizontally, which works by default if a parent container has relative width, but vertically as well. It usually represents your default viewer width in the page layout before any responsive scaling is applied. When it's set, the height of the viewer is automatically scaled relative to the scaled width.
    • minheight - if basewidth is specified, this setting represents the minimum viewer height in pixel. This can be helpful on small mobile screens where you may not want the viewer height to go beyond some fixed minimum. 
    • events - set it to true if your website has Google Analytics integrated and you would like to track user engagement with your 3D product views as per this recent article on our blog. 
    • name - if specified, this name will appear in your Google Analytics event tracking so you could sort out the events by each view. 
    • rootpath - if you host images on a CDN server or if you need to have a single xml config for all of your 360 views, you can configure the image location using this path. Please find more details in our user guide under API / rootPath.
    • graphics - absolute path to a folder with hotspot indicator images (if you use hotspots!). Note that we share all default indicator images on our CDN, so this path will work: https://cdn.webrotate360.com/lib/imagerotator/graphics
    • onready - pass your JavaScript API callback that accepts one parameter being the viewer API object. Please refer to our user guide under API / apiReadyCallback for more details about various API functions we currently support.

  • New WordPress Plugin With Full 3D Product Views and Native WooCommerce Integration

    Today we're releasing our completely reworked WordPress plugin (stable Beta v3.0) with several major features and enhancements as discussed below. You can download the new plugin using this link:

    DOWNLOAD

    Multi-row / 3D Product Views

    This new capability was introduced in v3.6 beta software & viewer in February 2015 (details). It's now used in production quite effectively by several companies and studios and we are pretty happy with it in our own testing as well.

    So far we have been offering help upgrading existing CMS plugin installations manually to help our users start using the new full 3D viewing capabilities along with a couple of extra v3.6 features. With this WordPress plugin rewrite, we packaged the latest release of v3.6 product viewer into the plugin itself, so no more manual file updates!

    To take advantage of this feature, just download our latest v3.6 beta software here (or request PRO version if you are our past customer) and then create and publish your 3D product views as discussed here and here. The rest of the WordPress shortcode integration remains exactly the same as in the previous versions of the WordPress plugin. You can learn more about the shortcodes on our new page here.

    Native WooCommerce Integration

    Until now, our WooCommerce integration was limited to just the content fields such as product descriptions. This new version of the plugin includes native WooCommerce integration, making it possible to embed your 360 or 3D product views directly in place of the main product image on your WooCommerce product pages. This is accomplished via an extra tab that is automatically presented in your WooCommerce product admin as shown below:

    3D product views in WooCommerce

    There are just two fields where you can configure your Config File URL as well as RootPath. Config File URL is a path to the viewer XML configuration file on your server for corresponding product view. This xml file is automatically created under each product view on publish using our desktop software. Root Path is optional and it's only required when you host the actual 3D product images on an external server or CDN. Config File URL as well as the Root Path setting are the same as shortcode's config and rootpath parameters respectively and are discussed here.

    WooCommerce integration uses several defaults from the WebRotate 360 Settings page, including viewer dimensions, responsive width, skin, as well as Master Config URL that you might use to have a single config file (xml) for all of your product views. When Master Config URL is specified, you only need to use RootPath under each product to point to a folder with the actual product images (the one that contains the "images" subfolder under your published view under 360_assets) on your server or CDN.

    360 product viewer settings in WordPress

    Since WooComemrces comes with its own version of the prettyPhoto library that it uses for image zooming, we have another WooCommerce specific checkbox on the settings screen to allow disabling prettyPhoto that comes with our plugin if there're any conflicts.

    Google Analytics Integration

    This is the first plugin with our integrated Google Analytics events which were introduced recently in v3.6. It allows tracking user engagements with your 3D product views as described here. So if your WordPress installation already has standard Google Analytics tracking hooked up, just check Use Google Analytics on the settings screen as shown above to enable tracking of the various viewer events.

    Track various 3D product viewer events in Google Analytics

    New wr360expand Shortcode

    This shortcode is configured in exactly the same way as wr360popup as described here minus width and height parameters. Unlike wr360popup, this new shortcode (wr360expand) opens up your product views in full-screen directly or full browser window if configured in the published view, bypassing the small popup.

  • New v3.6 Beta Release (Build 3.6.0.604). Now With Google Analytics!

    [Update, Jan 2023]: Analytics is now also available in PixRiot, which is our optimized (optional) hosting solution for 360 product photography and 3d product views.

    We're happy to announce that the new build of WebRotate 360 Product Viewer v3.6 beta is now available for download. This time, it's primarily to give our PRO users an early access to our new Google Analytics integration that makes it possible to fully track user engagement with your 3D product views using your standard Google Analytics dashboard.

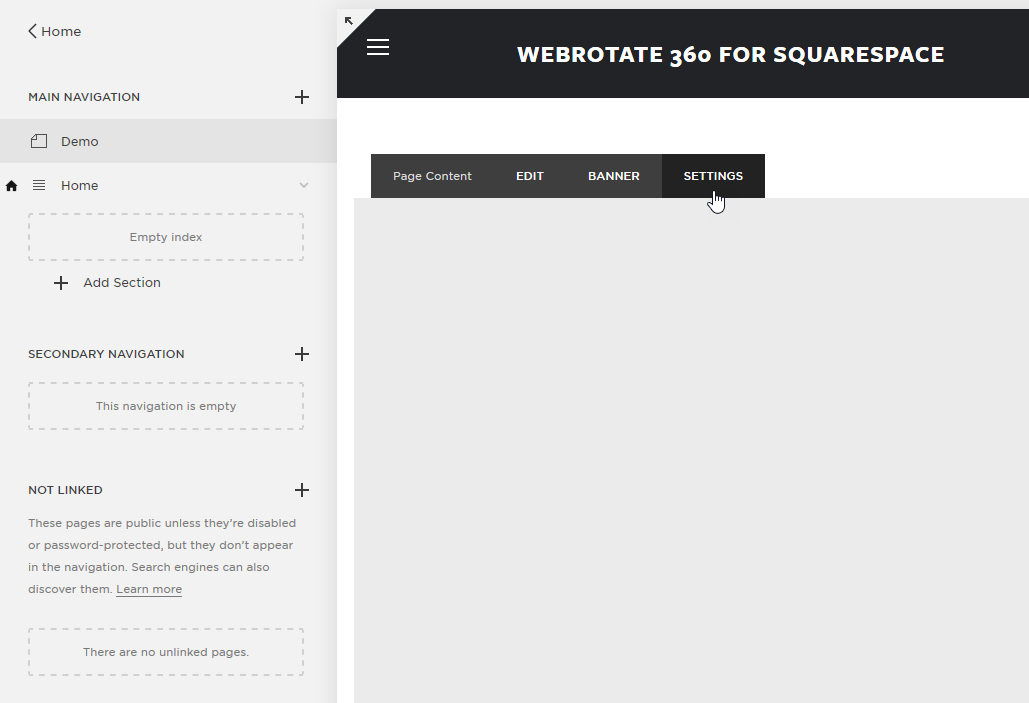
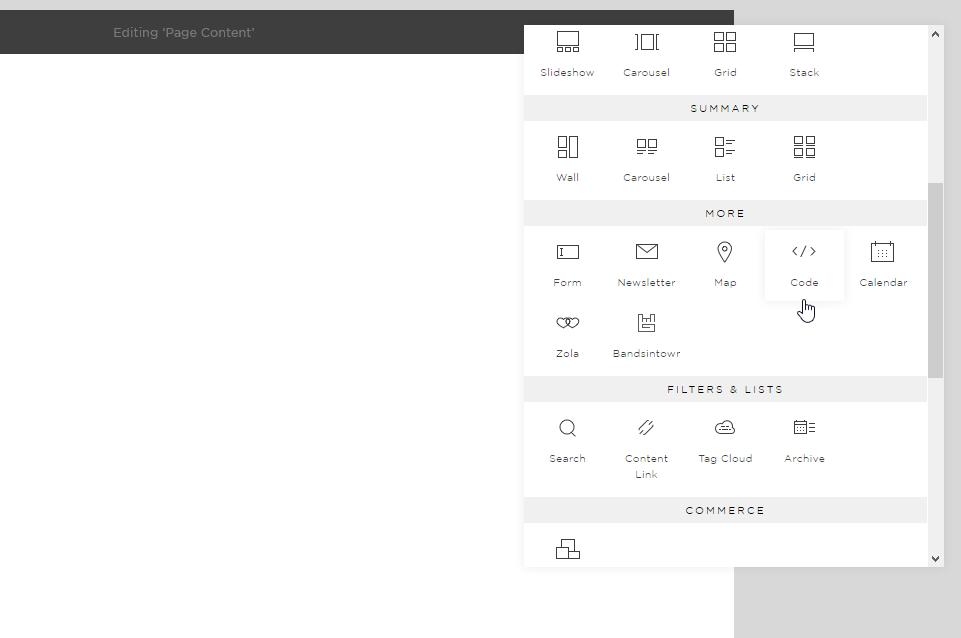
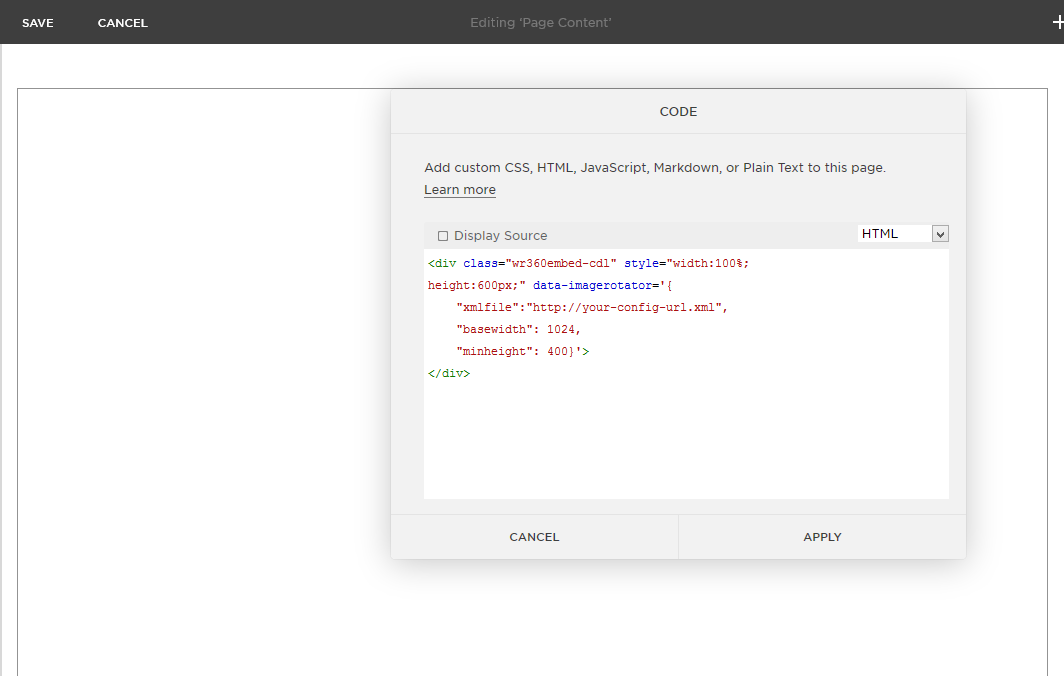
    To access this integration, click on the small button next to the Template drop-down on the Publish form as shown on the screenshot below.

    Enable Google Analytics Events

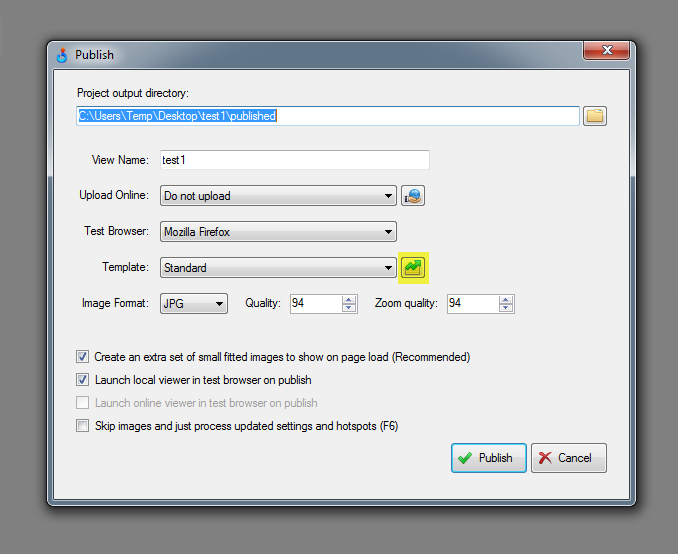
    Then check the first box to enable Google Analytics events for this project. If needed, you can also change the name of this project for the purpose of tracking this product view inside Google Analytics. This name becomes an event label that you will see once your start browsing WebRotate 360 events in your Google Analytics dashboard (GA dashboard) and will allow you to filter all WebRotate 360 events by product view.

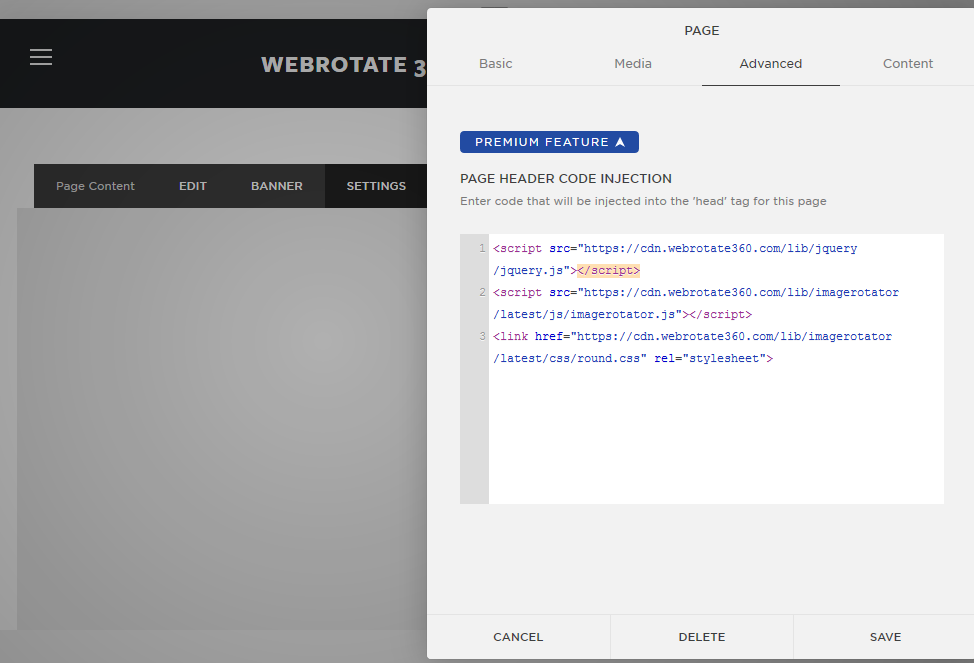
    Here you can also check to add Google Analytics tracking script to your published html template automatically on publish. This will require a tracking id which is a code that is automatically assigned to any web property in your GA dashboard. This tracking id usually looks like this UA-XXXXXXX-X and can be accessed either on the Home page of your Google Analytics (next to the website / property name in the list of properties) or via the Admin page under the Property settings.

    Google Analytics Integration Options

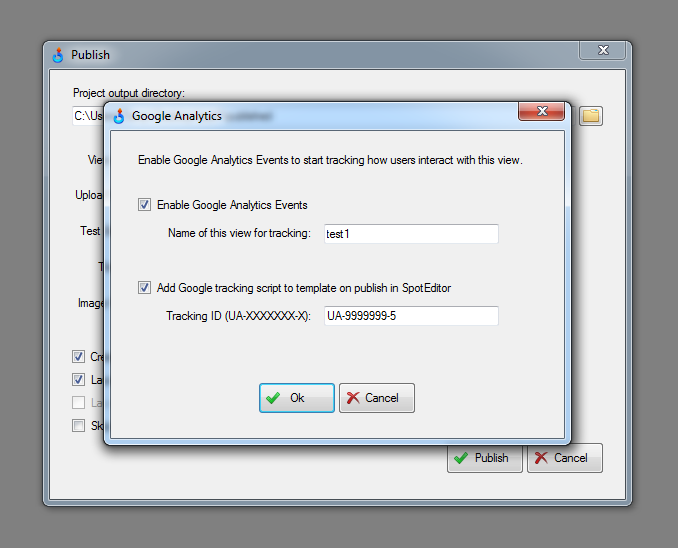
    When Tracking ID is configured as shown above, your published html will include standard Google Analytics tracking script, so once the published files are uploaded online, you can start testing the integration right away. If you are integrating your published product views with a website that has the Google Analytics script already hooked up, adding the tracking script and the id as shown on the screenshot is not necessary (it's there mostly for quick testing or when you need to embed the 3D views via iFrame).

    Note that our Google Analytics integration will first check if the standard Google Alanytics script is present on the same page where the viewer is loaded and if it doesn't find it there, it will try to access the script from a parent page if available. This allows integrating the Google Analytics tracking even when your 3D product views are embedded elsewhere via an iFrame.

    Lets review the types of events that are now available for tracking WebRotate 360 user engagement in your GA dashboard.

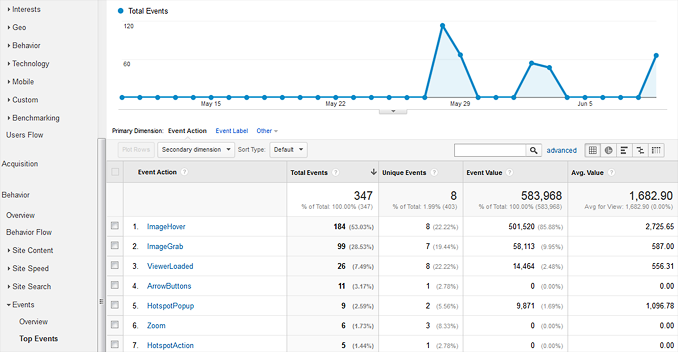
    All WebRotate 360 events are categorized under WebRotate360 category so once your published project is live, you can start browsing events that belong to this specific category (i.e, WebRotate360). These events will show either under the Real-Time tab of your GA dashboard (under Events) or via the Behavior tab as shown below which doesn't show real-time results but has more event details and more options for event filtering and navigation.

    3D product viewer user engagement in your Google Analytics dashboard

    There are currently 11 event (action) types that are being tracked in WebRotate 360 Product Viewer. Some of these events also include associated time value (in milliseconds) to give you more context for understanding how users engage with your product views. These extra time values give you a valuable quantitative measure of user engagement that directly corresponds to the time spent on a webpage while navigating interactive product views. All of these events also include event label that you can see and update on the Google Analytics form in SpotEditor for each of your product views as noted above.

    ViewerLoaded

    Fired every time a 3D product view is loaded in full. Includes the number of milliseconds it took for the 3D view to load in full.

    ViewerReloaded

    Same as ViewerLoaded but this event is fired when a product view is reloaded in-place using either our API or corresponding hotspot action (i.e hyperlink action pointing to an xml file).

    ImageHover

    Fired when user moves mouse cursor outside of the 3D product viewer or when the user starts dragging images with the left mouse button depressed or when a hotspot popup is activated. This event also includes the number of milliseconds that user spent hovering over the 3D product images. Note that the ImageHover event doesn't fire on mobile devices with touch screens.

    ImageGrab

    Fired when user stops dragging the images with either mouse or touch. Includes the number of milliseconds that the user spent dragging the images.

    Zoom

    Fired every time the toolbar Zoom button is clicked (on zoom-in only) or when the zooming function is triggered via double-click / double-tap. It's also fired when zoom-in is activated via API.

    Playback

    Fired every time the toolbar Playback button is clicked (on playback start only) or when the same function is triggered via API.

    ArrowNavigation

    Fired every time the toolbar Arrow buttons are clicked (left, right, up or down) or when the same functions are triggered via API.

    Fullscreen

    Fired every time the toolbar Full-screen button is clicked (on full-screen activation only) or when the same function is activated via API.

    HotspotsOnOff

    Fired every time the toolbar Hotspot On/Off button is clicked or when the same function is triggered via API.

    HotspotPopup

    Fired when user deactivates a hotspot popup that he / she just activated via tap, click or mouse hover. This event also includes the number of milliseconds that user spent reading or browsing the content of the hotspot popup.

    HotspotAction

    Fired when user clicks on a hotspot popup that has a hotspot action assigned (i.e hyperlink action, label action, etc).

    Our CMS and eCommerce plugins are being updated right now to seamlessly integrate with the new Google Analytics events so very soon all you would need to do (in your WebRotate 360 plugins for WordPress, Magento, OpenCart, etc) is to check a singe box in your plugin dashboard to enable the same analytics. The rest of the wiring is implemented inside the plugins such as event label assignment based on product SKU or shortcode and similar.

    DOWNLOAD

    Previously released features and fixes in v3.6:

    PRO & Enterprise customers can either request the commercial version of v3.6 Beta via support email (support at webrotate360 dot com). If you received v3.6 beta download URL from us before, it still works! And if you already have the previous build of v3.6 beta installed, you can simply download the new update via Check Updates on the About form in SpotEditor.

    If you need any help applying this update to any of WebRotate 360's plugins (i.e, WordPress, Joomla, PrestaShop, Magento, OpenCart, BigCommerce), please let us know and we would be happy to assist.

Subscribe to our newsletter

Sign up to our newsletter to keep a pulse on our latest developments, informative posts and beta releases. We don't abuse it!

Signup